
SEVA ZAKHARENKO
ZAM'S RITUAL DEFENSE
CONTEXT
The idea for this project originated from my love of the Tower Defense sub-genre of strategy games. I’ve always toyed with the idea of a Tower Defense game where, instead of being a third-person entity building the towers, you were in the lane alongside them. Rather than helplessly watching as your towers fail to defend against a wave of enemies, you could intervene personally. This new perspective was the inspiration for several of my design choices. Mechanics like tower placement, upgrade systems, level layout, and enemy selection are all affected by this shift in perspective. This article will go into more detail about each of these systems, and my approach to making it work best in this context.
Zam’s Ritual Defense is part of a mod for Half-Life 2. This particular mission is situated roughly half-way through the story. At this point, the player already has access to a few weapons, and is familiar with movement and combat mechanics.

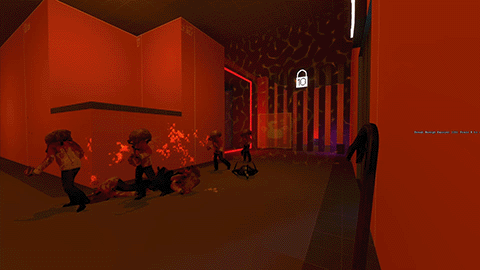
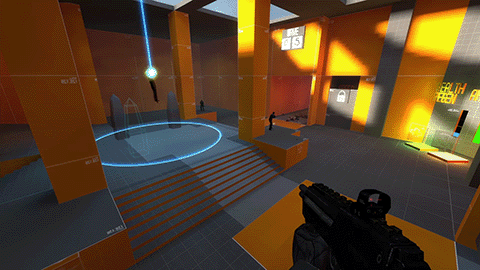
The intense action in the final wave of Zam's Ritual Defense
THE RULES
The premise of this mission is based off of a classic tower defense game. In a typical tower defense game, a player must defend one or more narrow lanes against a stream of “creeps” (enemies) that spawn at one end of each lane. The player has several different stationary “towers” at their disposal to help defend against the creeps. If a creep gets through the lane, the player loses a life. The game is over once every wave is cleared, or the player runs out of lives. The rules of Zam’s Ritual Defense mission are slightly different and break down as follows:
-
The player must defend the Central Chamber from waves of enemies coming from two tunnels. Zam is performing a ritual in the very center of the Central Chamber. When an enemy gets too close to Zam, one of four Containment pylons is destroyed along with the enemy. Once all four Containment pylons are destroyed, you become vulnerable. Any further enemies that get by will still be destroyed, but the player loses health as well.
-
There are two phases: Preparation and Defense.
-
During the Preparation Phase, you have 60 seconds to purchase any upgrades and defenses, or collect any loot scattered around the map. You can also use this time to regain health and ammo, however, energy is not generated during this phase.
-
During the Defense Phase, the enemy will attack your Central Chamber via one of two main attack paths. You also gain Energy during this phase and can continue purchasing defenses and upgrades.
-
-
Energy is the primary currency within this mission that is generated during the Defense Phase only. Energy is used to purchase defenses and upgrades.
-
The game ends after the player clears the 15th wave, or if their health reaches zero.
With the basic rules out of the way, let’s take a closer look at the layout, the different towers and other upgrades available to the player, as well as the enemies the player will be facing.

Example of a Tower Defense game, "Flash Element TD2"

Overview of Zam's Ritual Defense map, stylized to look like Flash Element TD2. Colored lines represent the many attack paths the enemies have.
Gameplay mechanics - LAYOUT
There were several goals required to make the ideal layout for this mission.
-
There must be more than one attack path for the enemies, otherwise, the player will simply sit at the exit of the only functional tunnel.
-
The player should have some sort of area that grants them quick access between all enemy attack paths (back hall)
-
The layout should be as small as possible while remaining functional to ensure the player can move about the level quickly.
-
There should be some areas where the player has long sight lines, to make sure the player can read the map as quickly and efficiently as possible.
-
As a side note, the layout must also contain some points of interest to incentivize the player to venture outside the main chamber.
Ultimately, the layout that best met my goals is in the image to the right.

Final map layout. Areas are color coded. A-E represent gates that open as the mission progresses. The red-hatched areas are enemy spawn areas, inaccessible to the player.
LAYOUT ANALYSIS
Since the player won't be able to see this layout from above at any point during the mission, it is important to teach the player how to navigate the level in a natural way. Before the start of the mission, every gate (Labeled A-E on the image above) is closed. Gate A is opened during the first wave, so the player only has to worry about the Western Tunnel. This gives opportunity for the player to learn about other mechanics, such as the traps and enemies.
Later on, Gate B opens, revealing the Back Hall. The Back Hall is an area that the player can use to quickly move around the map without having to go all the way around the long tunnels. Enemies do not travel through the Back Hall, so it is exclusively used by the player (with the exception of one enemy, covered later).

View from inside the back hall, showing the different exits the player can take to maneuver around the map.
The Back Hall does not initially give access to the Eastern Tunnel or Center Wing - the respective entrances are opened as more of the map is revealed later. This allows the player to get a feel for the purpose of this area while also receiving a little preview of what more of the layout looks like.
About halfway through the mission, Gate C opens, revealing the Eastern Tunnel. In order to keep the player from getting overwhelmed, Gate A closes to put the focus primarily on this new area. During the next few waves, Gates D and E open, showing the player how the layout loops around and connects back to the Western Tunnel. Finally, for the last 4 waves, all gates are open, and the player is free to roam the entirety of the map.
This intricate layout is nothing without the incentive for the player to explore and leave the main chamber. There are several ways I accomplished this. Firstly, the player naturally has to enter the tunnels in order to activate any of their defenses. This works for the early stages of the game, but as the player builds up their nest, it becomes easier to stay at home. In the middle and later stages, the player will have to explore the tunnels in order to stock up on much needed ammo and health. Furthermore, as the level opens up, upgrades to Energy Generation become available, two of which are located in the deepest area of the map - the Center Wing. In later waves, the player may find themselves needing even more energy. Energy Ore - a useful resource to the player discussed later - spawns mostly in the Center Wing and deep in the Eastern Tunnel, forcing the player to travel far from home to acquire it.
Gameplay mechanics - Traps
There are four traps available to the player, each with a pre-determined placement location. In a typical tower defense, tower positioning plays a huge role in how effective a tower can be. In Zam's Ritual Defense, since the player isn't able to see a top down view of the level, it is challenging for the player to make informed decisions about good tower placement. To combat this, tower placement is pre-determined to always be in an advantageous position. This is to ensure the player can't unknowingly make poor decisions. Furthermore, this allows the player to focus more on which towers to use, rather than where to put them.
Singularity Trap (Ground) - The singularity trap pulls enemies together in a tight clump for a short duration, but deals no damage. It is most useful when paired with other sources of Area-of-Effect (AoE) Damage. These traps can also be used to slow down an approaching wave, as the pulling effect locks enemies in for a few seconds. Unlike other traps, Singularity Traps activate automatically, regardless of if an enemy is nearby.
Poison Gas Trap (Ceiling) - The poison trap activates whenever an enemy enters its trigger zone. Once activated, it releases poisonous gas in a large radius for 10 seconds, and resets after 35 seconds. Because it deals its damage over a long period of time, it is most effective against slow, clumped enemies.
Bullet Trap (Wall) - The bullet trap is set up on a wall and is equipped with a laser that aims down the hall it is placed along. When this laser is tripped by an enemy, it fires a barrage of bullets down the hall, dealing damage in a 1 second burst. This trap has higher potential damage if placed down longer hallways. This trap resets every 35 seconds. Since its damage is dealt in a much shorter time than the Poison Gas Trap, but deals less damage, it is more effective against fast moving enemies.
Singularity Trap in action
Poison Gas Trap in action

Bullet Trap in Action
Trip Mine (Floor) - The trip mine is a single-use AoE trap that can be placed in the main chamber, close to Zam. They are used as a last resort in case a monster slips through your other defenses. They are not cost efficient when compared to other traps since they are single use, but they can come in handy in a pinch. They deal heavy damage to enemies when activated, and are the only trap that can damage the player as well (though not that much). Once activated, it cannot be re-armed for 15 seconds.
Mine Trap in Action
Gameplay mechanics - Upgrades
These upgrades are permanent - the earlier the investment, the more effective they are in the long run for the player!
Health Regeneration - This grants the player a slow health regeneration bonus for the duration of the mission (wherever they are). This upgrade has 4 tiers from 8.5 health per minute to 18 health per minute
Ammo Generator - The player can purchase a set of randomized ammo at the Ammo Generator. The more times the Ammo Generator is used, the more expensive it becomes.

The player's "upgrade corner"
Energy Regeneration – Four Energy Pylons are scattered around the map. Once activated, each increases energy generation by 20%.. More Pylons are available as more of the level is revealed, making it impossible to get all four pylons too early.
Damage Upgrade - Increase damage that you do with your own weapons for the duration of the mission. Ranges from 12% to 100% bonus damage.
Speed Upgrade - Increase movement speed for the duration of the mission. Ranges from 7% to 60%.

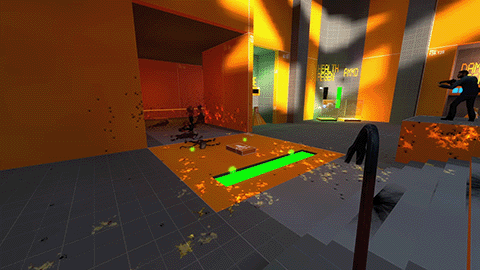
Several Energy Ores spawned in the eastern tunnel
Antlion Sensor - One of the most threatening enemies in this mission is the Antlion (discussed later). Being able to know when they are coming provides a substantial advantage to the player. The Antlion Sensor will play an audio cue as well as a visual cue when Antlions are incoming. Activating the Sensor is expensive but lasts the duration of the mission.
Energy Ore - Throughout the mission, energy ore is randomly generated inside the tunnels. Each energy ore grants the player 10 Energy instantly. The more enemies the player eliminates, the more quickly energy ore is generated. This makes later waves generate more energy, and rewards the player for moving through the tunnels.
Gameplay mechanics - OTHER PURCHASES
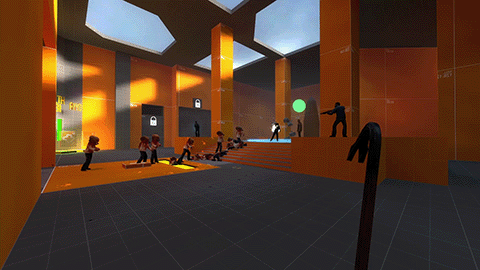
Human sentries helping fight off a wave
Human Sentry - The human sentries are a staple to almost any strategy. Up to four Sentries can be placed in the Central Chamber near Zam, one can be placed in the west tunnel and two in the east tunnel. They are equipped with either a mid-range SMG, or a short range Shotgun. Though their damage is relatively low for their cost, they are invaluable as a consistent source of damage. They are effective against all enemy types, but are especially useful against Shadows, which do not trigger Poison or Bullet traps.
Energy Walls - The tunnels through which enemies will arrive are blocked by energy barriers that enemies can pass through, but the player cannot. In order to explore the tunnels, you will need to spend energy to remove these barriers. In doing so, the player gains three advantages:
-
By unlocking more of the tunnels, the player is given more room to maneuver. This allows the player to start attacking enemies earlier on, getting early damage done without having to rely on last-second defense mechanisms.
-
The player also gains access to more trap tiles.
-
More access to various ammo, health, and energy boons scattered around the map.
Containment Pylons – When an enemy inevitably sneaks through your defenses, you can always replace a containment pylon.

Player can restore containment pylons at a cost
Gameplay mechanics - ENEMIES
With all of the upgrades discussed, let's take a look at what we are going to be up against. The mission features 15 waves of increasingly difficult enemies. The type of enemies during a given wave will remain constant, but the quantity of enemies is randomized. As the player progresses, the enemy variety will become more randomized in later waves. This creates a more diverse experience for replay-ability.
One of my main objectives when introducing enemies to the player was to make sure each enemy is introduced alone. This way, the player can learn how the enemy behaves on its own, then see how it interacts with other creatures. Additionally, this gives the player time to experiment with various strategies for each enemy.

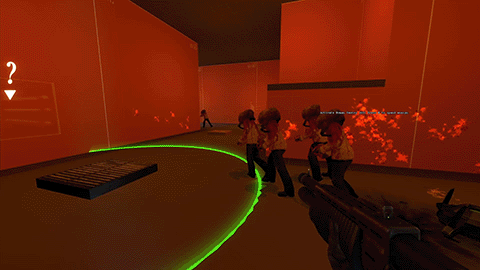
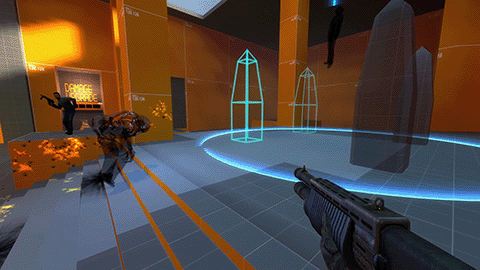
A horde of zombies and fast zombies approaches!
Classic Zombie - The classic zombie is sturdy but slow. Classic zombies do not fight the player; their only goal is to get to Zam. This makes them very predictable, and susceptible to every trap. What they lack in brains, however, they make up for in numbers.
Fast Zombie - The Fast Zombie is slightly less sturdy than the classic zombie, but is significantly faster. Fortunately for Zam, Fast Zombies are not interested in stopping his ritual; however, they are aggressive towards the player. Since fast zombies will follow the player, it's important not to stand near Zam when fighting them. Fast Zombies spawn less frequently than Classic Zombies. Because of their speed, gas traps are generally less effective against them, though bullet traps and singularity traps are still effective.
Warping Zombies - Sometimes the classic zombies have to get creative to infiltrate the Central Chamber. These zombies will warp straight into the Central Chamber, a short distance from Zam, bypassing all of your static defenses. The player will have to be quick to wipe them out. Human Sentries and your own arsenal are your best bet. Warping Zombies appear in groups of 2 - 5 at a time.
Big Boss Zombie - The Big Boss Zombie is a bullet sponge. He is slow like the classic zombie, but his large health pool makes him effective at tanking your defenses. When the Big Boss Zombie reaches Zam, he will knock away one Containment Pylon and teleport back into the tunnel a short distance away.
Zombies warping straight into the main chamber!
This ability allows him to survive Zam’s containment field, and potentially become a nuisance into the preparation phase. Since your defenses don’t prioritize targets, it’s primarily up to the player to focus down this enemy.
Antlion - The Antlion is very quick, like the fast zombie, and focused on the center, like the classic zombie. Fortunately, their health is extremely low and thus, with a fast enough reaction from the player (or good trap placement), are easily eliminated. They generally appear on their own or in a small group of 2 or 3. Activating the Antlion Sensor gives the player an audio cue when a group of Antlions approaches. Because of their speed, gas traps are generally useless against them; bullet traps and mines are the way to go.
Ghost - The Ghost is a medium speed enemy. They do not trigger any traps, though they can still take damage from them. Human Sentries are still able to attack Ghosts. Since traps don't activate on them, it is wise for the player to hunt them down on their own, instead of depending on Human Sentries.
Big Boss Zombie, taking out a pylon, then moving back into the tunnel
Carrier – The mother of all enemies, she has an unprecedented amount of health, but moves very slowly. As she moves across the map, she spawns enemies around her to draw attacks. Once she reaches her attack point, her spawns become less frequent, but she has the ability to attack Zam directly. Every few seconds, she charges up a laser that hits Zam for the equivalent of one monster getting through.

Ghosts, casually walking through trap triggers without activating them
CONCLUSION & FULL PLAYTHROUGH
Thank you for taking the time to read through the full analysis of Zam's Ritual Defense. If you are interested in playing the game for yourself, please use the contact page to get in touch with me about setting up a playthrough with you. If not, enjoy my full demonstration playthrough below!